
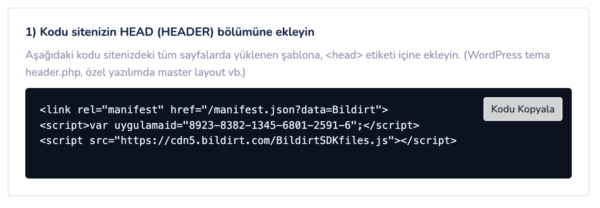
In this section, we explain how to integrate Bildirt installation codes into different platforms. Bildirt integration mainly consists of two parts:
- Adding the installation code obtained from the dashboard to your website
- Ensuring that manifest.json and BildirtSDK-sw.js files are accessible and functioning properly
General Setup Logic
You need to add the installation code so that it loads on all pages of your website. The most reliable method is to place the code in the global <head> section of your site.
- After adding the code, make sure to clear your cache
- Check the installation status from the “Installation Verification” section in the dashboard
WordPress Integration
For WordPress websites, the most practical method is to add the installation code into the <head> section. There are two common approaches for this.
Method 1: Header/Footer Script Injection (Recommended)
You can use “Header/Footer Script” type plugins to add the installation code without modifying theme files.
- Log in to the WordPress admin panel
- Open the header script section
- Paste the code you received from the Bildirt dashboard into the Header / Head area
- Save and clear your website cache
Note: Some performance plugins (minify/defer) may affect script execution order. If you encounter issues, try disabling these settings temporarily for testing.
Method 2: Adding to Theme Files (Advanced)
If you prefer not to use a plugin, you can add the installation code directly into your theme’s header.php file, just before the </head> tag.
To prevent losing changes during theme updates, it is recommended to use a child theme.
Custom Websites (HTML / PHP / Laravel / React / Next.js)
For custom-built websites, add the installation code to the global layout of your application, ensuring it loads on all pages within the <head> section.
- Laravel:
<head>section of your shared layout (blade) file - React/Next.js: global layout / document head section
- HTML/PHP: shared header file or the head section of all pages
Site Builder Platforms (Shopify / Webflow / Wix etc.)
On these platforms, integration is typically done by adding the Bildirt installation code to the “Custom Code” or “Head Code” section.
- Add the installation code to the Head section whenever possible
- After saving, publish your site and refresh the platform cache
Note: Some platforms may impose restrictions on service worker usage. In such cases, refer to the relevant guidance in the Errors & Status Codes page.
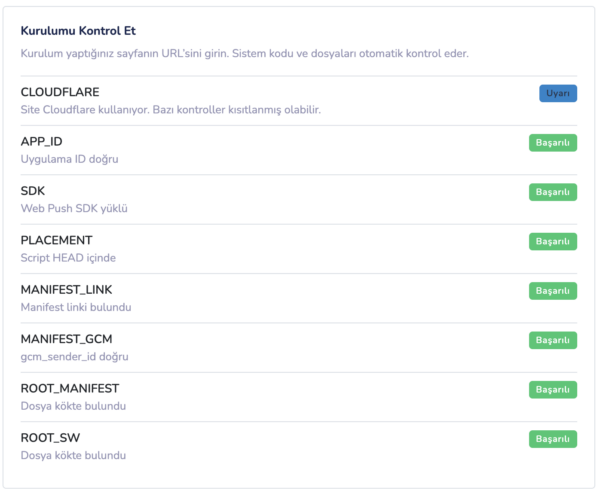
Installation Verification Checklist
After completing the installation, it is recommended to perform the following checks:
- Does the installation status appear as “successful” in the Bildirt dashboard?
- Is the manifest.json file accessible when opened in the browser?
- Is the BildirtSDK-sw.js file accessible when opened in the browser?
- Is your website running over HTTPS?
If any of these checks fail, go to the relevant section in the Errors & Status Codes page and follow the suggested solutions.
Next Step
After completing the integration, you can start using notification delivery and automation features.
In the next section, we will provide a step-by-step guide for WordPress integration.